Raspbery Pi GPIO using PureScript
Overview
This is a quick overview of how you can use PureScript on a RaspberryPi to do GPIO
Installing Node JS
The version of NodeJs available in most of the distros is quite old. There are a few ways to get a new version. Personally I found that installing the same version of node that I have on my desktop on the pi worked best. To do this get the version you need from https://nodejs.org/dist/.
Then run the commands with the appropriate version numbers
if you prefer to get the latest, and a more automated install, then you can follow the instructions here Beginner’s Guide to Installing Node.js on a Raspberry Pi
PureScript on the Pi
PureScript itself does not seem to install on the pi, so you’ll need to compile on a desktop machine and copy the resulting JavaScript files across
Raspberry Pi GPIO
GPIO can quite easily be done using unix files. This is not particularly fast but it should be more that sufficient for many use cases. It is also simple enough that it can even be done directly from the shell. If you need faster access FFI to one of the broadcom libraries is probably the way to go.
The GPIO ports are exposed here
To use a GPIO pin for basic IO you need to do the following
- Ensure that the port is “open”. Write the port number to
/sys/class/gpio/export - Set the direction by writing “in” or “out” to
/sys/class/gpio/gpioNN/direction(where NN is the pin number) - Set the pin value by writing “on” or “off” to
/sys/class/gpio/gpioNN/value - Read the pin value by reading from
/sys/class/gpio/gpioNN/value
Raspberry Pi Pin numbers
The Raspberry Pi pin numbers are a little confusing. There are different models of the pi (A, B, B+, rev 2 etc). There are also different numbering schemes i.e. pin numbers, gpio numbers, wiring pi numbers…
When you are looking at existing code or examples make sure you know which scheme is being used.
Here is a good reference showing pin number and GPIO numbers
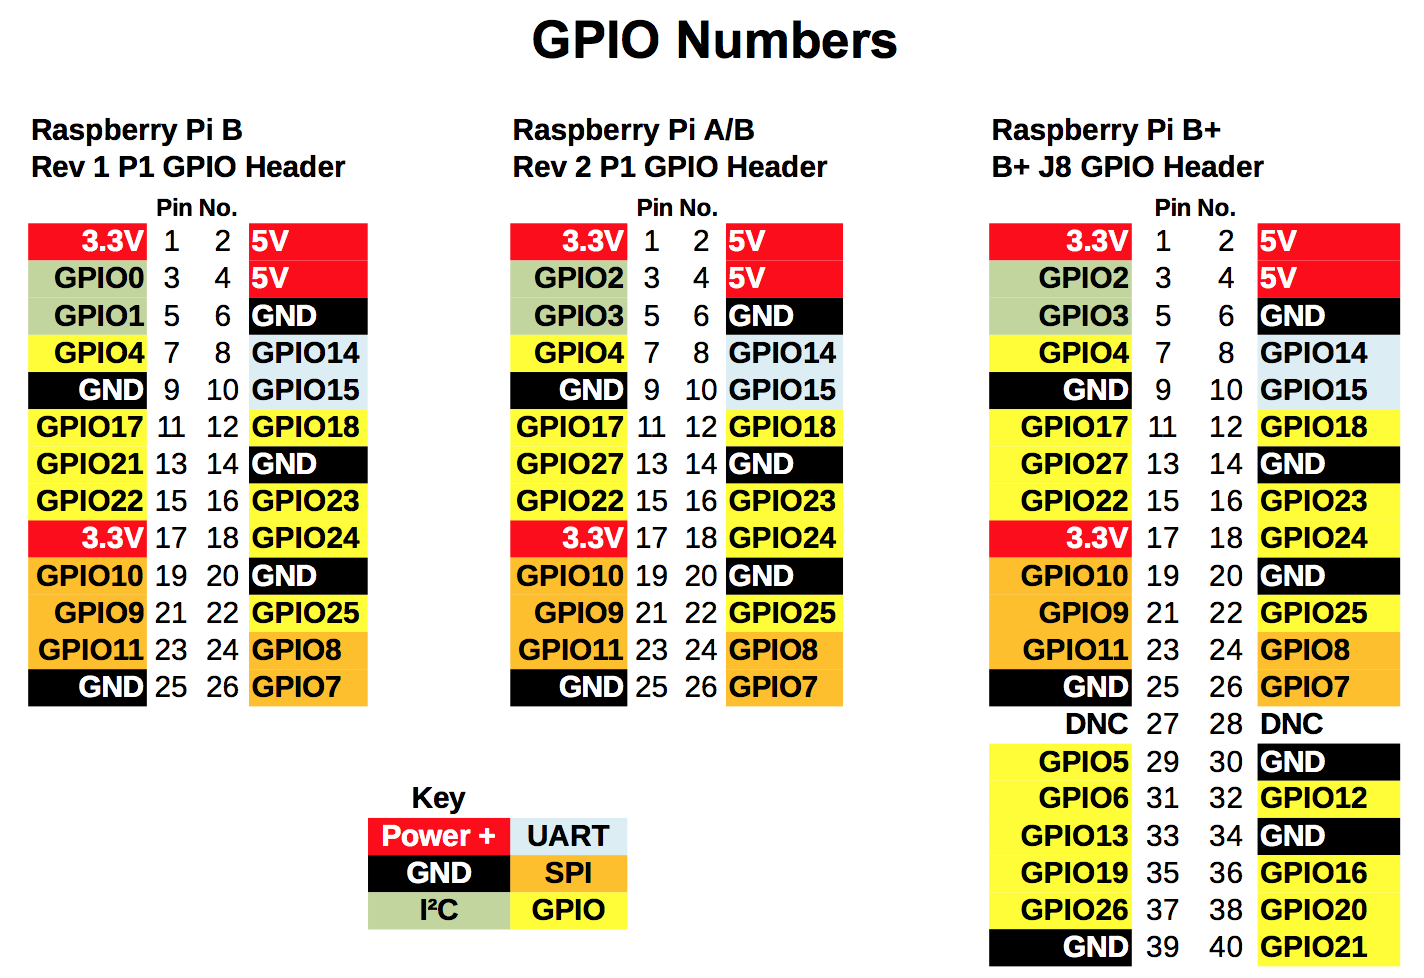
PureScript
GPIO types
Dealing with the various pin numbering schemes
As shown above the physical pin numbers are used when working with GPIO, so all the functions here work with a pin number (Pin newtype). Then there is a module per board that can be used to map from a logical GPIO number to a pin. In this example I’ve only defined the layout for the Rev 2 A & B P1 boards.
import Gpio (Pin (..))

data GpioPin = GpioPin2
             | GpioPin3
             | GpioPin4
             | GpioPin17
             | GpioPin27
             | GpioPin22
             | GpioPin10
             | GpioPin9
             | GpioPin11
             | GpioPin14
             | GpioPin15
             | GpioPin18
             | GpioPin23
             | GpioPin24
             | GpioPin25
             | GpioPin8
             | GpioPin7

toPin :: GpioPin -> Pin
toPin g =
  case g of
    GpioPin2  -> Pin 3
    GpioPin3  -> Pin 4
    GpioPin4  -> Pin 7
    GpioPin17 -> Pin 11
    GpioPin27 -> Pin 13
    GpioPin22 -> Pin 15
    GpioPin10 -> Pin 19
    GpioPin9  -> Pin 21
    GpioPin11 -> Pin 23
    GpioPin14 -> Pin 8
    GpioPin15 -> Pin 10
    GpioPin18 -> Pin 12
    GpioPin23 -> Pin 16
    GpioPin24 -> Pin 18
    GpioPin25 -> Pin 22
    GpioPin8  -> Pin 24
    GpioPin7  -> Pin 26
GPIO
To “open” a port you write the port number to the export file. This function first checks if the port is open
open :: Pin -> forall e. Eff (fs :: FS, err :: EXCEPTION | e) Unit
open (Pin pin) = do
  e <- S.exists $ "/sys/class/gpio/gpio" <> show pin
  if not e
    then
      S.writeTextFile E.ASCII "/sys/class/gpio/export" (show pin)
    else
      pure unit
Set a port to be in or out. Remember that you can read a value from a port that is set to be output, you read if the port was set to on or off. Reading from a port set to in means that you are reading the value from the pin, i.e. is the pin being held high or low by an external input.
setDirection :: Pin -> Direction -> forall e. Eff (fs :: FS, err :: EXCEPTION | e) Unit
setDirection (Pin pin) dir = do
  let dirStr = case dir of
                  In -> "in"
                  Out -> "out"
  S.writeTextFile E.ASCII "/sys/class/gpio/gpio18/direction" dirStr
Set an output pin to high or low
setValue :: Pin -> Boolean -> forall e. Eff (fs :: FS, err :: EXCEPTION | e) Unit
setValue (Pin pin) on = do
  let val = if on then "1" else "0"
  S.writeTextFile E.ASCII ("/sys/class/gpio/gpio" <> (show pin) <> "/value") val
Read the current value from the pin
getValue :: Pin -> forall e. Eff (fs :: FS, err :: EXCEPTION | e) Boolean
getValue (Pin pin) = do
  val <- (Str.trim <$> S.readTextFile E.ASCII "/sys/class/gpio/gpio18/value")
  pure $ val /= "0"
E.g. Toggle GPIO 24
main :: forall e. Eff (console :: CONSOLE, fs :: FS, err :: EXCEPTION | e) Unit
main = do
  let pin = R.toPin R.GpioPin24

  R.open pin

  v <- R.getValue pin

  R.setDirection pin R.Out
  R.setValue pin $ not v
Building and running
Build the purescript
You then need to copy everything from the output folder to a folder on the pi
Finally copy your compiled bundle across
Note that you only need to copy the output folder again when you add more imports. Otherwise just copy your bundle to save time.